Cloudflare
This page covers the Cloudflare domain name, certificate, tunnel, and DNS configuration.
Note
The tunnel configuration requires a Cloudflare Zero Trust account, which is free, but will require you to enter a payment method(Credit card or PayPal).
Automatic Configuration
-
With a Cloudflare API key the manual configuration steps below can be automated utilizing the configure-rf script and providing the Cloudflare API token when prompted.
-
The configure-rf script will then call the setup_cloudflare script.
-
If issues are encountered with the script you can still follow the sections below to verify settings manually.
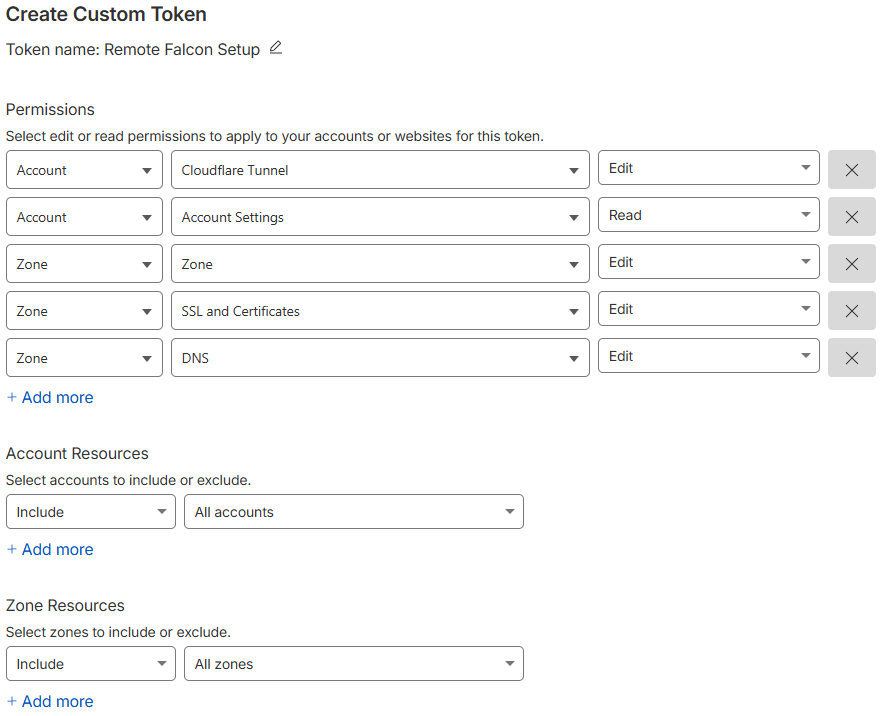
Create Cloudflare API Token
-
Go to Cloudflare API Tokens
-
Click Create Token
-
Click Create Custom Token
-
Name the token 'Remote Falcon Setup'
-
Configure the token with the below settings:
Account/Zone Resource Permissions Account Cloudflare Tunnel Edit (to create and configure tunnels) Account Account Settings Read (to retrieve Account ID) Zone Zone Edit (to add domains to Cloudflare) Zone DNS Edit (to create DNS records) Zone SSL and Certificates Edit (to configure SSL settings and create origin certificates) Account Resources Include All accounts (or select a specific account if you prefer) Zone Resources Include All zones (recommended) OR All zones from an account -
Click Continue to summary
-
Click Create Token
Warning
Copy the token immediately and save it to a notepad - you won't see it again!
-
Proceed to GitHub configuration if you want to build Remote Falcon images through GitHub or you can skip to the Remote Falcon installation if you want to build images locally.
-
During the Remote Falcon installation enter your Cloudflare API Token at the prompt:
Manual Configuration
If the setup_cloudflare fails or if you prefer to configure things manually you can follow the steps below to get Cloudflare configured.
Add Domain Name to Cloudflare
If not already added, you'll have to add your domain name to Cloudflare
-
Go to the Cloudflare Dashboard and click Add a Domain
-
Enter your existing domain name or purchase a new one from Cloudflare
-
Click Continue
-
Select the Free plan and click Continue
-
Delete any existing A or CNAME records that are pointing to * or yourdomain.com and click Continue
-
Copy the Cloudflare nameservers and go to your domain name registrar and update the nameservers for your domain to the Cloudflare nameservers.
-
Click Continue on Cloudflare
-
Skip the Quick Start Guide by clicking Finish Later
You will have to wait some time for the new nameservers to take effect.
Cloudflare will send you an email when your domain is available. You can continue with the additional setup so it will be ready to go when your domain is available.
Certificate
-
Click SSL/TLS on the left side of the Cloudflare Dashboard
-
Enable the options under each 'SSL/TLS' section
SSL/TLS
- Full(Strict)
- Enable SSL/TLS Recommender
- Enable Always Use HTTPS
- Enable Opportunistic Encryption
- Minimum TLS Version Select TLS 1.3
- Enable TLS 1.3
- Enable Automatic HTTPS Rewrites
The client certificate is not required for this configuration
Create an origin certificate and copy down the certificate and private key
These will be used later in the Remote Falcon configuration script
Create the certificate such as:
*.yourdomain.com, yourdomain.com
Select Key Format: PEM
Warning
The free Cloudflare plan does not let you create wildcard certificates for sub-sub-domains (ex: *.sub.yourdomain.com) unless you purchase Advanced Certificate Manager.
Cloudflare Tunnel
Go back to the main Cloudflare Dashboard page if not there already.
- Click Zero Trust
- Click Networks
- Click Tunnels under Networks
- Create a tunnel
- Select Cloudflared and click Next
- Pick any name you would like for your tunnel. Example: rf-yourdomain
- Save tunnel
- Select Docker under choose your environment
- Copy the whole 'docker run cloudflare' command and paste it into a notepad
- Click Next
Note
Ensure you have copied the whole token. We will need it later in the configuration script.
Configure both public hostnames
Public Hostnames
Tip
The Service URL must be set to the NGINX container_name in the compose.yaml which is 'nginx' by default.
First public hostname with BLANK subdomain
Warning
You may receive an error if you already have DNS records. You will need to delete any existing A or CNAME records pointing to * or yourdomain.com
-
Subdomain:
leave it blank -
Domain:
yourdomain.com -
Service Type: HTTPS
-
Service URL:
nginx
Click Additional application settings -> TLS
-
Origin Server name:
*.yourdomain.com -
HTTP2 connection: On
Click Complete setup / Save tunnel
-
Click the newly created tunnel and click Edit.
-
Click Public Hostnames
-
Click + Add a public hostname
Second public hostname with * WILDCARD subdomin
Note
Ignore the warning about 'This domain contains a wildcard." We will manually add the wildcard entry under the DNS settings later.
-
Subdomain:
* -
Domain:
yourdomain.com -
Service Type: HTTPS
-
Service URL:
nginx
Click Additional application settings -> TLS
-
Origin Server name:
.yourdomain.com -
HTTP2 connection: On
Click Save
Catch-all rule
-
Click Edit to the right of the catch-all rule.
-
Type or paste
https://nginxand click Save.
DNS
With the Cloudflare tunnel configuration completed. Go back to the main Cloudflare Dashboard.
-
Click yourdomain.com
-
Select DNS -> Records
You should see a CNAME record that was created automatically for the tunnel.
Example tunnel DNS record
| Type | Name | Content |
|---|---|---|
| CNAME | yourdomain.com |
248a0b11-e62a-4b0e-8e30-123456789101112.cfargotunnel.com |
Click + Add Record and add it as below, substiting yourdomain.com for your domain name.
| Type | Name | Target |
|---|---|---|
| CNAME | * |
yourdomain.com |
Click Save
Now you should have two DNS records.
Both should be proxied.
Example DNS records
| Type | Name | Content |
|---|---|---|
| CNAME | * |
yourdomain.com |
| CNAME | yourdomain.com |
248a0b11-e62a-4b0e-8e30-123456789101112.cfargotunnel.com |
Scroll down and you should see the Cloudflare Nameservers.
Ensure that you are using these name servers with your domain name registrar/provider.
Next is GitHub configuration if you want to build Remote Falcon images through GitHub or you can skip to the Remote Falcon installation if you want to build images locally.